The owner/operator of a town water tower had requested an inspection due to a water leak from the holding tank, causing worry as it was the town’s primary source of water.
The water tower is constructed of concrete with a steel lining. The lining is coated using an American Water Works Association (AWWA)-approved product. The exterior concrete shell showed traces of an aesthetic coating that once displayed the town’s name and had deteriorated since application, exposing the original concrete. The dome of the tower had more recently been recoated (I believe in the past five to eight years). Although issues were noted with the lining and exterior shell, this article will focus on the premature failures in the dome section only.
I was asked to join the inspection crew to assist with any coatings questions and, if time permitted, complete an inspection and provide a report. As the coatings were not the primary focus, no inspection tools were provided. It would have to be a visual inspection only.
The visual inspection relied heavily on six ASTM standards:
1. ASTM D610-08, “Standard Practice for Evaluating Degree of Rusting on Painted Steel Surfaces;”
2. ASTM D714-02, “Standard Test Method for Evaluating Degree of Blistering of Paints;”
3. ASTM D772-18, “Standard Test Method for Evaluating Degree of Flaking (Scaling) of Exterior Paints;”
4. ASTM D4214-07, “Standard Test Methods for Evaluating the Degree of Chalking of Exterior Paint Films;”
5. ASTM D660-93, “Standard Test Method for Evaluating Degree of Checking of Exterior Paints;”
6. ASTM D661-93, “Standard Test Method for Evaluating Degree of Cracking of Exterior Paints.”
No quality assurance (QA)/quality control (QC) reports could be provided by the owner, which should have taken place during the application of the coating. One report was provided that was from a coating inspection completed on the tower a year prior, and it was given a “passing grade,” aka no major defects. Once we got on site, we were able to deduce more information about the potential cause(s) of the premature failure.
On-Site Observations
The inspection of the water tower revealed interesting defects located on the exterior concrete dome and parapet. To get inside the water tank, we needed to access the hatch located on the dome and, while walking on the dome, the brittle coating made crunching sounds under our boots.
After a quick glance around, I began to wonder if the limited time allotted for the job would allow ample time to inspect the tower’s coatings properly, as the leak was the client’s priority. Thankfully, I was able to fit in a thorough inspection of the dome’s exterior while the leak investigation was being completed inside the water tank by other crew members. This allowed time to inspect the interior lining and the exterior shell afterward.
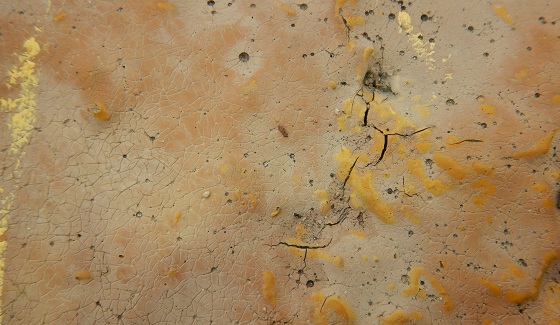
The first step I took was to determine the extent of the coating failure because that would be the most time-consuming aspect. An approximately 25% coating failure along with adhesion failure occurred on the dome and was mapped out using yellow chalk (see Figure 1). It was mapped out in detail using a hammer-sounding technique — essentially light tapping and then marking where a noticeable sound change was occurring.
A map of the yellow chalk locations was also drawn on paper and provided in the report. It was common to find concrete adhering to the underside of the coating, indicating that the coating tension was greater than the concrete bond strength (see Figure 2).
One observation of note on site were the drain holes. They were elevated in the parapet and did not allow all the rainwater to exit the dome, causing the water to be trapped around the dome (see Figure 2). Water was seen penetrating the underside of the dome, which could have originated from the stagnate water, contributing to the failed coating and failed sealants around the hatchway.
Cracking, defined by ASTM D661-93 as a break extending through to the surface painted, can be confused with checking. Checking is defined by ASTM D660-93 as the phenomenon manifested in paint films by slight breaks in the film that do not penetrate through the last-applied coating. In this case, it was easy to determine the defects as cracking in the coating as shown in Figure 3 due to the noticeable dark large breaks. Also observed was staining, which was common where the coating failure occurred and the concrete was visible.

Additionally, checking was discovered upon closer inspection (see Figure 3). The first type of checking noted was specifically “mosaic checking” (Type ASTM 2 TNO 8).
Another unique defect found among all of the others were craters with checking lines converging on them (see Figure 3). Common assumptions in this case would be that the craters were caused by air added into the paint from mixing or from excessive thinners added. However, as I was not present during the application process, nor provided with a QA/QC report from the original application, only inferences can be made.
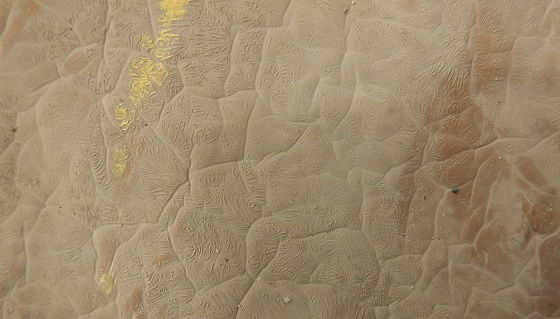
Another type of checking was also noted on other areas of the dome, and it resembled long line checking (Type ASTM 2 TNO 8), but again it wasn’t what it at first appeared to be. When I stood back, I was able to understand what I was really looking at: This checking was located on top of what turned out to be a defect known as alligatoring, indicating various formulation and application errors of the coating (see Figure 4).

Another defect I observed happened at the start of the inspection while I was setting up safety lines for my fall restraint on the tower dome. I started to notice milky white blotches in a few areas. When I was able to get close enough, I noticed scratches in an X pattern in the coating, which one could surmise to be the result of a cross-hatch test as shown in Figure 5. However, I presumed that the white blotches were from caulking that would have been used to seal the X and that complete coverage was not achieved.
I must mention that caulking is not a best practice in repairing these kinds of damaged areas. They should be properly prepared and recoated. Additionally for this project, if a cross-hatch test was completed on the dome, it begged the question, “Where was the report?”
Report
After any inspection, when writing a report, I must avoid including any prejudices and opinions, only offering facts and findings.
For the purposes of education via this article, I will risk adding that I suspect a few major underlying issues could have been avoided. One of my suspicions is that the newly formed concrete on the dome and parapet was not given the proper cure time needed before the coatings were applied.
I was informed that concrete repairs were performed on the dome and parapet prior to the latest coatings being applied. Another suspicion I have is that the coatings were applied too thickly since I found defects throughout that fell into the category of applicator errors.
We must ask ourselves again, “Where was the QA/QC during the application process? Where did the QA/QC report go if it does exist? Why did the prior inspection report not pick up on the defects mentioned above?”
The damage to the parapet was so extensive that chunks of concrete were falling to the ground, creating a hazard for the townspeople below. The hazards were so concerning that we brought it to the attention of the manager of the water tower. Existing debris around the tower and the sloped hillside made it easy to mask any newly fallen debris.
As with any large structure, I am glad to have gotten the chance to inspect it, but I did not get to see if any repairs were performed.
Key Takeaways
To avoid these types of failures in the future, the client needs to mandate following QA/QC guidelines, such as adhering to manufacturer’s recommendations.
Had the original application been supervised by a third-party inspector, a report generated and given to the client, and the client having maintained their own records, the breakdown point would have been avoided and if not, then it would be traceable. Under proper application processes, the coating should not have displayed the multiple failures that were noted.
Additionally, there was likely a later inspection performed, which completed destructive testing, and without a proper recoat, it was left unprotected. It is far too common in the industry that for a project to be completed on time, record keeping is often omitted. To avoid these types of failures in the future:
• Maintain QA/QC guidelines.
• Include a third-party inspection and oversight.
• Mandate repairs of any failed coatings following inspection.
• Adhere to manufacturer’s recommendations, and contact the manufacturer when in doubt.
Editor’s note: This article first appeared in the January 2024 print issue of CoatingsPro Magazine. Reprinted with permission.