Commercial contractors know the challenges with concrete outdoor structures. While owners may like the natural look of concrete, they can become dissatisfied facing years of constant preservation.
Concrete, despite its solid appearance, is porous and can deteriorate over time if not repaired. Exposure to freeze-thaw cycles and ground shift can cause concrete to flake/scale off and crack. Also, de-icers can cause mild to significant surface damage. Another problem is the use of steel rebar, which is designed to stabilize large slabs of concrete in commercial structures. If rebar gets exposed through a crack and begins to rust, the rust can expand and crack concrete even further.
Two-component polyurethane or polyurea spray coatings can eliminate these issues. The process may add cost to the initial project, but it becomes much more cost-effective in no time. The key is having the job done right so it lasts for years. Read on for ways to correctly apply coatings and additional tips for a successful outcome.
Step 1: Surface Prep
This first step actually involves three parts: cleaning, masking, and priming. In other words, to finish a deck or patio correctly it must be started correctly.
Surfaces must be dry and clean. All seams and joints should be caulked. New concrete must cure a minimum of 28 days before applying sealer and topcoat. Clean and degrease as needed with high-pressure power washing. A mild acid etching will open pores on the surface. Check for spalling, laitance, or other imperfections. Mechanical abrading or scarifying may be used depending on severity of the deterioration. Follow up with a final wash and vacuum.
Masking comes next. Spraying by its very nature is airborne and can cause damage if structures surrounding the deck or patio are not covered with plastic or masking paper. This should be applied to a height/width of at least 6 to 8 feet (1.8–2.4 m) to protect against possible overspray. Wind speed and direction should also be taken into consideration for additional overspray concerns.
Applicators can also use masking to create unique designs. This involves a spraying/masking/ re-spraying technique, which offers something that may not be available with plain concrete.
After masking, you should carefully press thin wire Trim Tape over the outer edge of the masking tape. After the final spraying, this wire tape will be pulled to cut a smooth, clean edge.
The third part is priming. A special two-component primer/sealer is recommended to aid in repair, weatherproofing, and crack prevention as well as bonding.
Step 2: Equipment Setup and Safety Check
With the deck ready to spray, the next step is to lay out the hose and gun. This will determine whether there is adequate hose length to reach the farthest point of the deck or if the machines need to be repositioned. Laying out spray, breathing, and compressed air hoses to stay behind the applicator will greatly aid in the speed and quality of the application process. For large commercial projects, a start-stop plan is needed to spray in sections.
Safety during the entire spray process is essential. This includes protecting eyes, nose, mouth, and skin. The applicator must always wear all required safety equipment, which may include booties, full spray suit, gloves, head sock, eye and ear protection, and a supplied fresh air respirator. Personnel aiding in the spray process close to the applicator must also have on a respiratory spray mask and gloves at minimum. All other people need to remain a safe distance from the applicator and potential overspray.
Step 3: Application of Protective Coating
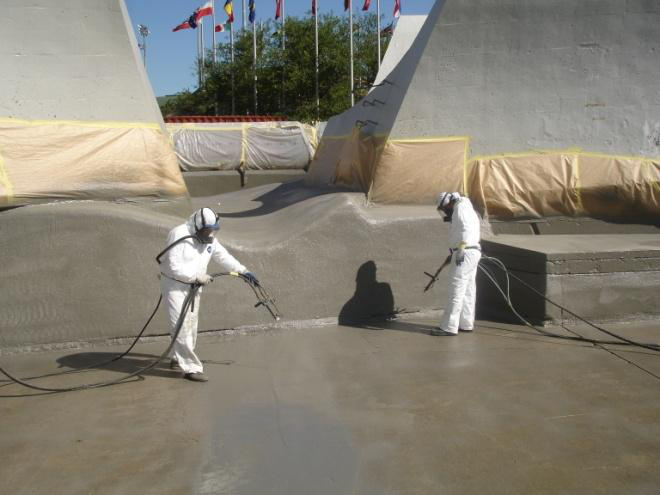 Spraying is done by walking backwards and spraying forward. Applicators start by spraying all the seams and cracks before applying the first full coat. Several coats are added until the desired thickness is achieved, for instance a minimum total thickness of 1/16 inches or 60 mils (1,524 microns). With an average of a five-second set time for ArmorThane products (time may vary for other products), each coat can be quickly applied one after the other. Spraying over the seams with each additional coat and blending into the adjacent areas of the deck or patio surface will allow the seams to virtually disappear.
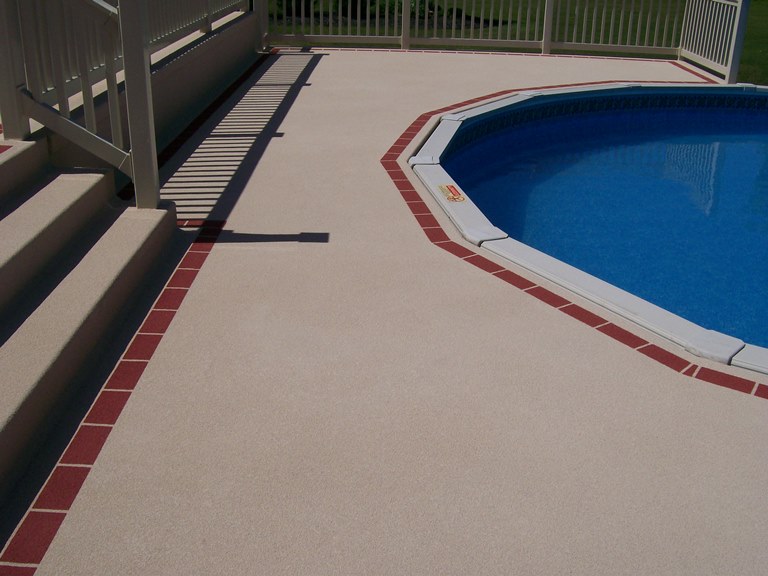
Depending on the project, coatings come in any color to blend or contrast with surroundings. If a masking technique is used to create a design, different colors can be sprayed in layers.
Step 4: Texturing (Optional)
After the third or fourth coat, the surface will be smooth, even shiny. The surface can be left like this or textured. Texturing can serve a three-fold purpose:
1. Create a more slip-resistant surface,
2. Add durability to the deck or patio surface, and
3. Help bond loose aggregate that has been sprayed on the surface.
Texturing can be done in two ways: one is by applying aggregate and the other is by using the polymer in a texturing spray technique.
1. Applying aggregate: Several materials can be used and are available in fine, medium, and coarse textures. As the final coat of the polymer is being applied, the applicator simultaneously uses a handheld sandblasting gun to start spraying the stream of aggregate/filler directly into the stream of the coating. This continues until the desired surface grip and look are achieved. As soon as this double-gun process is completed, the applicator immediately continues texturing the surface using only the gun that is spraying the coating. This is done by holding the gun 7–8 feet (2.1–2.4 m) away from the surface and quickly spraying back and forth to bond any loose aggregate.
2. Texturing spray technique: This technique requires spraying a final coating that yields a rougher surface than the process of spraying the first three or four coatings. Using the same polymer but holding the gun further away (7–8 feet, or 2.1–2.4 m, from the surface), the applicator quickly sprays back and forth. This allows the coating to fall as droplets, creating the texture. Be sure to watch for wind, which may create additional overspray using this higher spraying technique. Also be sure to check frequently for even texturing. The more spraying done, the rougher the texture becomes.
Step 5: Trimming
As with the first step, trimming will make the difference between the deck looking sloppy or professional. The key is to start with the loose end of the trim tape wire and slowly pull with a steady, controlled motion to prevent the coating from coming loose. This removes the masking materials and creates a smooth, straight edge. The trim tape should be pulled after completing each section. Waiting too long may cause it to fail and break against the hardening polymer.
As the masking tape and plastic or masking paper are slowly taken away, the edges should be checked for any rough residue. Any rough edges can be fixed with a knife, but be sure to keep the knife blade sharp to ensure a straight, smooth edge. And use proper precautions to avoid accidental skin lacerations.
Returning the Surface to Service
While polymers can dry quickly, the deck takes longer for the “final cure” to become tough and resilient. We advise that a finished surface can be walked on in 45–60 minutes, and after an additional hour it will withstand any adverse weather conditions. Waiting 24 hours is recommended for heavy foot traffic and furniture resetting.
If done correctly, polyurethane- or polyurea-coated decks, porches, balconies, and patios will last for years with a weatherproof, low maintenance surface. The overall goal of these projects is to create a look that both the owner and the applicator will be proud to show.
About the Author
Jack Anderson, who started as an authorized dealer/applicator for ArmorThane 15 years ago, is now involved in multiple functions in the international headquarters. He trains new and established dealers/applicators around the world, assists with 24/7 technical support, evaluates research and development’s new coating and equipment applications, and assists in the manufacturing of customized mobile coatings trailers. Anderson is also certified by the Polyurea Development Association. For more information, contact: ArmorThane, (800) 227-2905, www.armorthane.com